Wednesday 22 November 2017

Birthday Card


Hi friends!
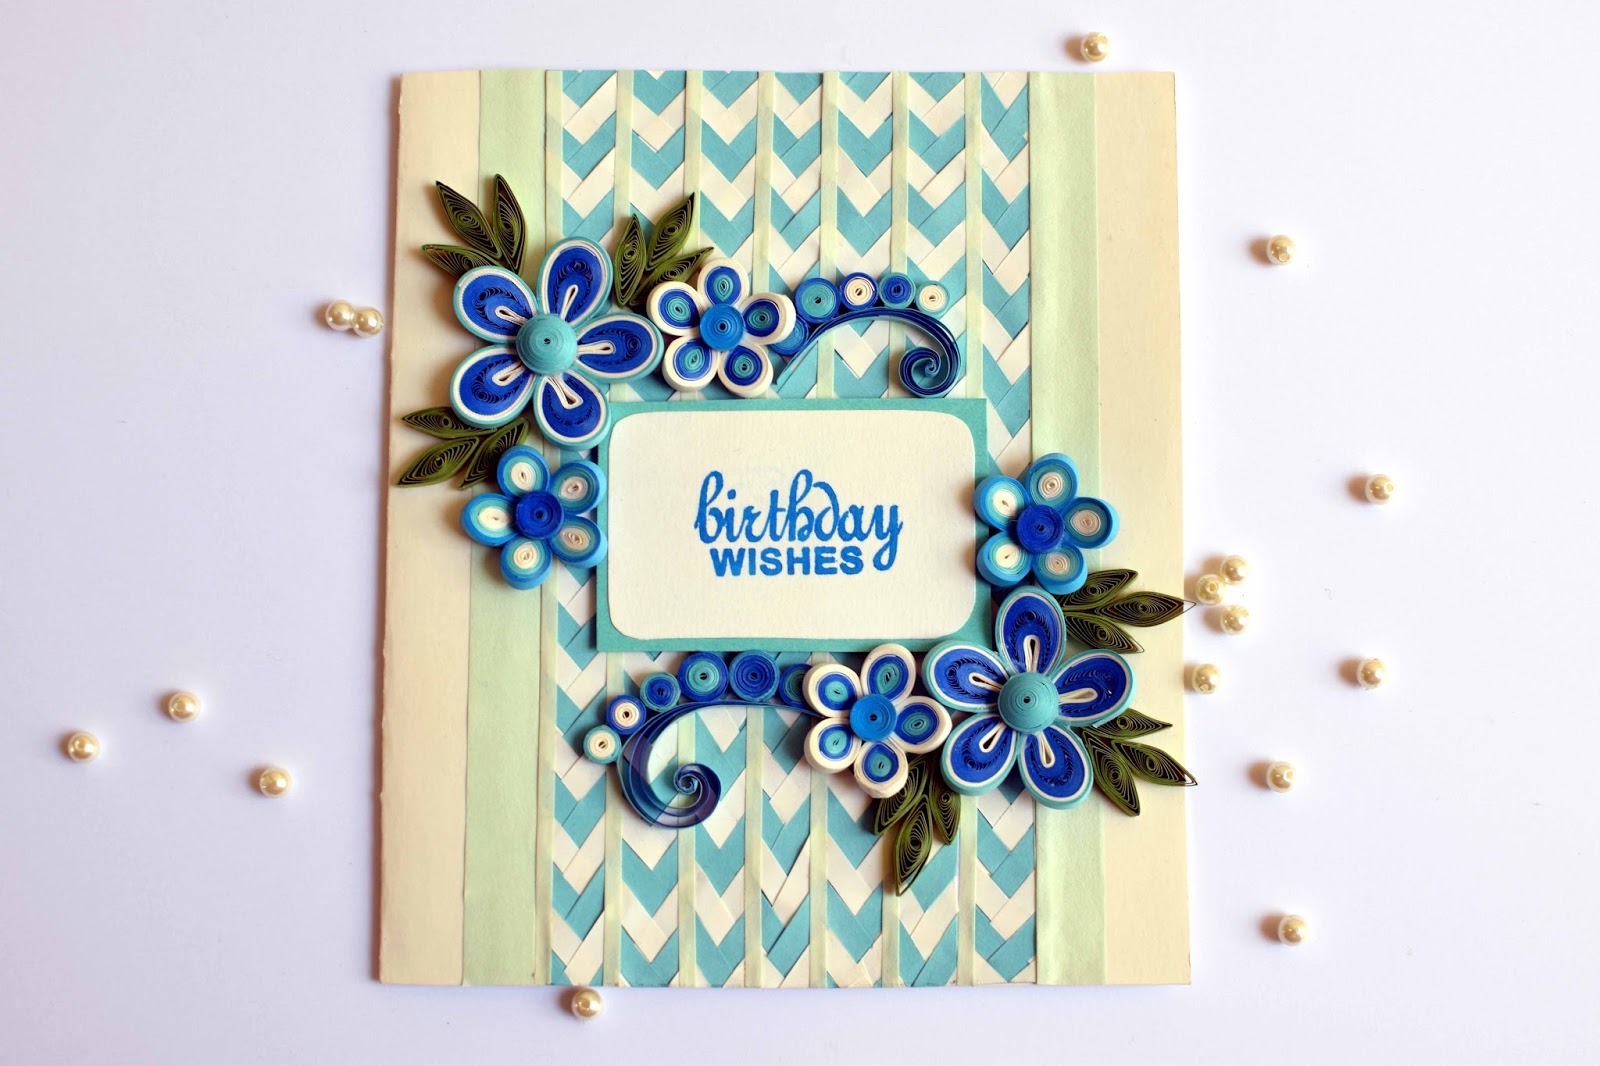
My today's post is about quilled birthday greeting card.
I have started with making braided pattern using blue and white 5mm Strips for the background.
I have created total 7 braids and connected all with each other. Also I have added light green 3mm strip between these braids.


Then I created some quilled flowers and leaves .
I took 10'' x 7'' card stock for base. First I added braided pattern on it. Then I arranged flowers and birthday sentiment on it.


So that is the card for today


Hope you all liked my effort.
Thanks for stopping by.


Saturday 21 October 2017

Quilling Ganesha

Hi everyone.. my today's post is about quilling Ganesha..


I have started with making Ganesha sketch and then I filled whole area with quilling shapes using different techniques.


Hope you all like my work.
Thanks for stopping by.
I am attaching this for
IQCG Challenge # 41 Festive/ Holiday


Sunday 10 September 2017

Fall


Hi Friends! My today's post is about fall!

I created Maple leaf quilled greeting card.


I have started with making base of maple leaf by sketching it on paper.
After that I created border and veins using crimped brown and red 3mm strip.
Then I have started filling inside leaf using yellow, light orange, orange and red color 3mm strips. I have created leaf shape for all colors to fill whole leaf. Then I cut maple leaf shape and removed access paper.


Then for the base I used white card stock which measures 7 x 5 inches. I did some embossing and distressing using hot shades like orange, yellow and red on it.

I added bakers twine on one side of card. After that I added Quilled Maple leaf on card. Added sentiment and some sequins. And then I added this card on Craft card base which measures 5 1/2 x 15 inches.

Link for Fall card tutorial:


So my card is ready. Hope you all enjoyed my work. Thanks for stopping by. Please share some thoughts about my creation.

I am attaching this card with

IQCG challenge No. 40 Fall


Friday 28 July 2017

Dream Catcher


Hi friends.. I am posting today about very interesting thing to decorate your room that is Dream Catcher.. 

I have created this dream catcher for my own. I have started with making thread rings( I used yarn here) using string art. Here I created four different size rings. I took card board as a base of rings and covered these card board with colored paper. Then I attached some tight coils around it.


After that I connected rings with each other by adding pearls chains between these rings.


I attached key chain holder ring on top to make it hang. And at the end I have connected some quilled feathers on bottom of rings.


Hope you all will like my work. Thanks for stopping by. Please share your thoughts.

I am attaching this dream catcher project with


Wednesday 21 June 2017

Blue Love


Hi friends! My today's project is about blue quilled card.


First I have started with making my background. I created braided strips using ocean blue and white 5mm strips. Then I combined 7 braided strips to make base. 
After that I created flowers, leaves. I also added some tight coil drops to quilled swirls. And at the end stamped the sentiment.


Hope you all will like my work. Thanks for stopping by. Please share your thoughts.

Youtube tutorial for this card 


I am attaching this card with

Layered Card


Hi everyone! My today's project is about layered card. 


I used 'wild rose' stamp set from mudra.
First I took 8" × 6" white card stock. Then I stamped flowers and leaves wherever required. Then I colored all flowers and leaves using my pencil colors yellow, orange, red, dark green and light green. After that I cut this peice of card in three parts like below picture. Then I added black card stock lining to all the pieces and combined them.


I added sentiment from same stamp set using off-white embossing powder on black base. At the end I added little sequins and some pearls in the centre of flowers for some extra touch.


Hope you all will like my work. Thank you for stopping by. Please leave some comments.

I am attaching this project with


Wednesday 10 May 2017

Colours of life

Hi friends.. writing post after long time.. hope all are doing great. This time I am posting about colours.. I like to use different shades in my project. And what will be better than Quilling for that.

So my post is about rainbow color heart box.


I have started with taking cardboard for base. Then I cut heart shape of that. Then after wrapping cardboard heart with coloured paper I added multicoloured paper hearts in decreased size on the base.


Then I created multicoloured coils using one and half 3mm strips. For each row I added total 40 coils. And I used 20 shades in total. 


Similarly I created top and decorated with some quilled petals and half cut pearls.

So that is my project for today. Hope you all will like. Thanks for dropping by.


Video tutorial 


I am attaching this project with


Saturday 11 March 2017

Love yourself

Hi everyone,

I hope you all lovely ladies had good time on the occasion of Women's day!

This time I decided to make gift for my self. Always we are busy in our daily responsibilities and does not get time for ourselves. So my today's post is about love yourself, feel special, and be happy so that you can make everyone happy.


I made one bracelet for me using my favourite art Paper Quilling.


The diameter of this bracelet is 2-1/2".
I started making tight coli ring of 2-1/2" diameter using 10mm strip. Then I just attached 4 rings to each other to construct bracelet and to give some height. After that I have started decorating it using lots of different shapes using 3mm strips with different colours. I also used small mirror to decorate my bracelet.


Hope you all will like my project. Thanks for stopping by. Waiting for comments.

Video Tutorial 


I am attaching this project with


Monday 6 March 2017

Celebrating Women's day

Hi everyone..

Today my post is about Women's day. There are many women in my life who always support me, encourage me and love me for all I do for my passion. So my today's card is dedicated to all that women who plays an important role in my life.


I have started with water color paper which measures 13x13 c.m. I stamped little cute birdies from Mudra Stamps. Then I have created mask for birds to cover it. After that I created mask for clouds and started distressing with Ocean Reef artistry ink from Shilpi. Then I colored birds using my color pencils.


Then I have embossed the sentiment using Rangers Emboss It Pen Clear and Wow embossing powders with blue, yellow and peach color. It's hand written sentiment. Then I just added some hearts here and there from same stamp set using Orange Popsicle Artistry ink. Then I created pennant banner design with my marker and colored those banners with blue, orange and yellow markers.
At the end I just punched corners and pasted the card on Blue card stock which measures 14x14 c.m.

Hope all of you will like my project. Thanks for stopping by , please comment.

I am attaching this card for 


Monday 6 February 2017

LOVE

Hi friends..

It's a love month.. and my best friend is getting engaged. He wanted to gift his new love something unique and beautiful. So I decided to make Quilled heart shaped box.


For this I took one mount board to create base in heart shape and covered that base with red paper. I created malesian flower petals with combination of white and red strips and red tight rolls. Just two shapes for this box.


First I added tight coils and petals according to my design on the base. Then I started adding tight coils on the edges of base heart. I increased the level of box till nine rows. For each row there are total fifty coils. Similarly I created lid. Just on top I added some 3 dimensional flowers. And on center of flower I used my new collection of half pearls and on center flower I added new glitter balls. That's it..


Hope my friend, his fiancee and you all will like this project. Thanks for dropping by. Please don't forget to comment.


                                                           Video Tutorial


I am attaching this project with
IQCG Challenge #34 Love is
Unstampables challenges #65 Anything goes
Twist of using something new

ICRCFEB17- Valentine Project + Add some dimension